The Legend of Xanadu Dub Project…
- MAIN PAGES
- Introduction for NON-GAMERS
(Please read! Yes, it's for you.) - The Legend of Xanadu
(Basic primer on series…) - The LoX Dub Project
(Audition today!)
- HELPFUL GUIDES
- How to Record Your Voice
(Rules & Best Practices) - Name Pronunciation Guide
(Listen to this, then properly pronounce character names)
- OUR PORTFOLIO
- LoX + LoX II Translations
(Screenshots of our work)

How to Record for the The Legend of Xanadu Dub…
")
Ninety percent of what you should worry about is your performance, but there are a few technical things you're going to need to be aware of in order for us to be able to use your work.
We're only in the casting phase now, but all of these things apply nonetheless.
This guide is mostly aimed at people who haven't done a lot of recording before. Veterans will find it all pretty basic. However, even if you're an ace at this stuff, I hope you'll still take a look at the fourth section, because it outlines something I need you to do that is very specific to this project. After that, you can skip to the eleventh section.
- Choosing a decent mic
- Setting your recording device to 16-bit 44.1KHz
- Configuring Audacity
- Measuring and cropping takes accurately <–Everyone must read!
- Speaking/recording at a good volume
- Choosing a location with low reverb for recording
- Noise Filtering
- On lip-syncing
- Optional words and adapting lines
- Exporting WAV files with proper naming and sending them to me
- The digest version
1. Choosing a decent
mic
If you're worried
about money, good news! Nearly every scene in these two games has
background music, and this goes a long way toward covering up the
difference between a pricey great mic and an affordable decent mic.
I'm not even going to get into recommendations other than to say that I've heard really good things about the Snowball and the Yeti. On Amazon, it looks like this is a good deal, too. If you want to set something up approaching pro-quality, well, that is a whole other universe. I just want to set a minimum bar.
If your mic cost under $20, I'm afraid there is very little chance that it's going to be good enough to use.
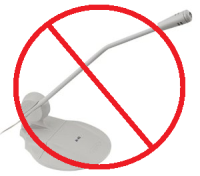
If it's made for size/weight efficiency, like a headset mic or a desktop mic, then it probably will not be good enough unless it's very high-end.
Also, beware of mics that are made for karaoke, which a lot of the $30-range ones are. These are basically designed to be shouted into at point-blank range, and they often do very poorly at picking up soft speaking. They can also require being so close to your mouth that they pick up all kinds of breath and saliva sounds, too.
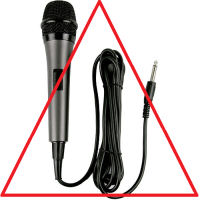
Not that all mics shaped like this are bad, of course. I have one of these, and it's fine, but it's not as cheap in the US as it is in Japan, where I live. At that price range, I'd spring for the Snowball.
You can audition using a crappy mic if you want to, as long as you can assure me that you will use a good mic if you get a part.
Some soundcards are absolutely terrible at analogue recording. My cheap ASUS laptop picks up loud interference every time the hard drive reads or writes something, believe it or not. If you are using a mic with a 3/8" jack plugged directly into a soundcard and have multiple computers, consider experimenting to see which one is best.
Top
I'm not even going to get into recommendations other than to say that I've heard really good things about the Snowball and the Yeti. On Amazon, it looks like this is a good deal, too. If you want to set something up approaching pro-quality, well, that is a whole other universe. I just want to set a minimum bar.
If your mic cost under $20, I'm afraid there is very little chance that it's going to be good enough to use.
If it's made for size/weight efficiency, like a headset mic or a desktop mic, then it probably will not be good enough unless it's very high-end.
Also, beware of mics that are made for karaoke, which a lot of the $30-range ones are. These are basically designed to be shouted into at point-blank range, and they often do very poorly at picking up soft speaking. They can also require being so close to your mouth that they pick up all kinds of breath and saliva sounds, too.
Not that all mics shaped like this are bad, of course. I have one of these, and it's fine, but it's not as cheap in the US as it is in Japan, where I live. At that price range, I'd spring for the Snowball.
You can audition using a crappy mic if you want to, as long as you can assure me that you will use a good mic if you get a part.
**A quick note about connecting a
mic through your computer's 3/8" analogue mic jack.**
Some soundcards are absolutely terrible at analogue recording. My cheap ASUS laptop picks up loud interference every time the hard drive reads or writes something, believe it or not. If you are using a mic with a 3/8" jack plugged directly into a soundcard and have multiple computers, consider experimenting to see which one is best.
Top
2. Setting your
recording device to 16-bit 44100Hz
In order to
maximize audio quality, we want to put all recordings through as
few conversions as we can. On your end, you can do a lot to help
this, the first of which is setting your recording device (your
mic) to 16-bit 44,100Hz in your OS.
On a Windows PC, you can do this by right-clicking on the volume icon in the system tray on the lower right, then selecting Recording Devices. Double-click the mic you want to use to access its properties. Under Advanced, you can usually choose between 16-bit 44,100Hz and 16-bit 48,000Hz, and some people will find high-quality options up to 24-bit 192,000Hz.
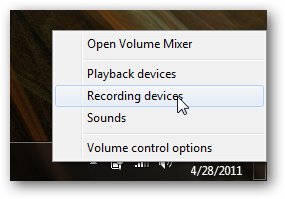

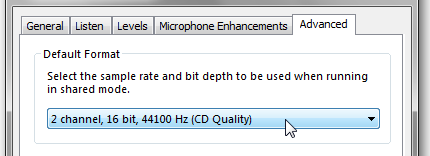
On a Windows PC, you can do this by right-clicking on the volume icon in the system tray on the lower right, then selecting Recording Devices. Double-click the mic you want to use to access its properties. Under Advanced, you can usually choose between 16-bit 44,100Hz and 16-bit 48,000Hz, and some people will find high-quality options up to 24-bit 192,000Hz.
You might
think the higher the quality setting, the better, but that's
not necessarily the case. We will always be mixing down to
16-bit 44,100Hz, and if you record at anything other than
that, there is going to be a conversion phase where we lose
quality.
Should you happen to be using an old PC, please make extra sure that your mic is not set to record below 44,100Hz, or else we will have a quality problem of a much more desperate order.
I'm not familiar with Macs, but it sounds like there is a similar OS-based quality setting. This page seems to give a good description of how to change it.
Top
Should you happen to be using an old PC, please make extra sure that your mic is not set to record below 44,100Hz, or else we will have a quality problem of a much more desperate order.
I'm not familiar with Macs, but it sounds like there is a similar OS-based quality setting. This page seems to give a good description of how to change it.
**Note: If you are doing a
boss part for which we are going to apply distortion
effects, then you probably ought to record at the highest
quality possible. After the effects are applied, we can mix
down to standard-quality.**
Top
3.
Configuring Audacity
Audacity
is the official recommended software for this project. If
you use something else, please make sure it is configured
similarly to what is explained below.
Under Edit -> Preferences -> Quality, you will find something similar to the OS settings in the above section, except that this is what Audacity will use internally. The only thing that really matters here is selecting the 44100Hz sample rate. The sample format can be anything at or above 16-bit. While you're here, setting all of your sample-rate converters to Best Quality isn't a bad idea, although it shouldn't be necessary if your OS is feeding Audacity the same sample rate that it's recording.

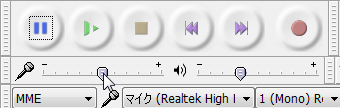
There is another step you can take that isn't related to quality, but will cut your file sizes in half and make life easier. Next to the microphone on the main panel, change the recording type from (Stereo) to (Mono).
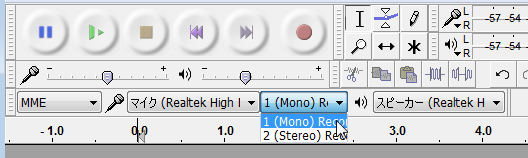
You should be good to record now. If there is any problem, double check that your mic is showing up in your OS's recording devices list, and click around the options in Audacity (where it says MME and Realtek High in my example above) until you find the right combination.
Top
Under Edit -> Preferences -> Quality, you will find something similar to the OS settings in the above section, except that this is what Audacity will use internally. The only thing that really matters here is selecting the 44100Hz sample rate. The sample format can be anything at or above 16-bit. While you're here, setting all of your sample-rate converters to Best Quality isn't a bad idea, although it shouldn't be necessary if your OS is feeding Audacity the same sample rate that it's recording.
There is another step you can take that isn't related to quality, but will cut your file sizes in half and make life easier. Next to the microphone on the main panel, change the recording type from (Stereo) to (Mono).
You should be good to record now. If there is any problem, double check that your mic is showing up in your OS's recording devices list, and click around the options in Audacity (where it says MME and Realtek High in my example above) until you find the right combination.
**Note: Please do not use
any processing on your voice, e.g. pitch or tempo
adjustments, unless you are doing a boss part. At least,
don't do it without showing me the difference first. If
I approve, you should record at the highest quality
possible and mix down after the effects have been
applied.**
Top
4.
Measuring and cropping takes accurately
**This
is highly critical. Please read carefully!**
Seriously, if you ignore this, I won't be able to use
your stuff no matter how good everything else is.
Next to every English line in the script, without exception, you'll find the number of seconds that the corresponding Japanese original took up measured to an accuracy of one-tenth of a second. Please aim for your takes to match these times.
You do not have to be perfectly exact. However, you will probably need to be within a few tenths of a second, and if you're more than 0.5 seconds off, we probably won't be able to use the take.
Also, be aware that it is much more dangerous to exceed a time than not to fill it. In other words, if the script calls for 5.4 seconds, it is much better to come in at 5.2 seconds than 5.6 seconds. The trouble with going over is that you force the next line to be abrupt, and even risk overlapping it. It's much better for there to be a slightly longer pause between lines, generally speaking.
Wherever the English timing can, or even should, be different from the Japanese timing, I have noted this in the script. This should be easy to understand, but don't hesitate to ask me if you're confused.
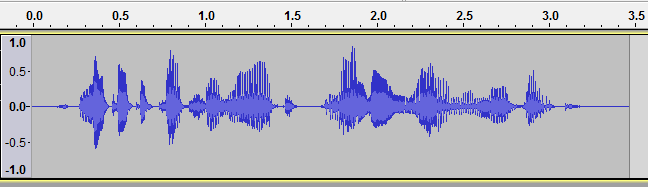
So, here is how to measure your timing.
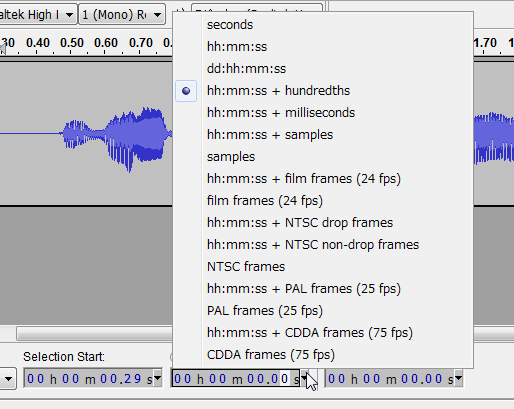
At the bottom of the Audacity window, you should see an option to select End or Length. Click Length. Then, click the arrow in the box below that and select hh:mm:ss + hundredths. Now, whenever you use your cursor to highlight a section of audio, this box will show the amount of time you have highlighted down to the hundredth of a second.

This next step is key: Zoom in. You can do this with Ctrl+1, or you can click View -> Zoom In. Do it repeatedly until you see dots representing 1/10 of a second, or at least one step before that.
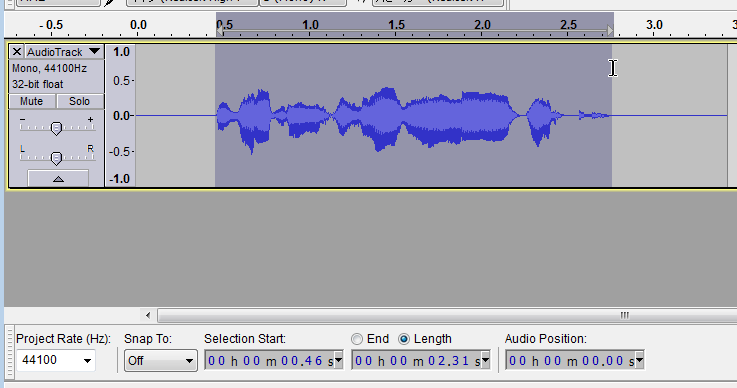
If you do not do this, then you will not be able to measure the length of a take accurately. For example, as you can see above, I have measured this take to be 2.31 seconds long while zoomed in. However, let's do some excessive zooming out and measure again.
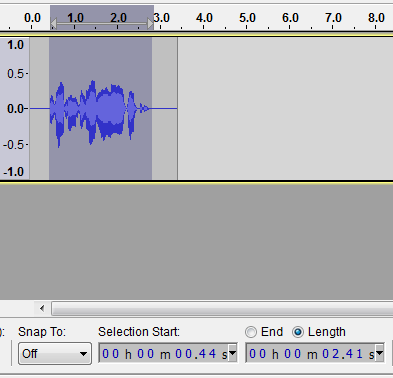
This is the exact same audio, and I've tried to measure it carefully with my mouse, but zoomed out, I'm getting an inaccurate reading of 2.41 seconds. As I said before, a tenth of a second isn't necessarily deal-breaking, but there's really no reason not to be measuring accurately here.
Zooming in is also important for when you cut off unnecessary sound from the beginning and end of your take. When you are zoomed in, you can clearly see where your speaking starts and stops. However, if you are zoomed out too far, you run the risk of accidentally chopping off a little bit of your voice when you delete the surrounding excess.
Once you've got a take that measures out like you want, just highlight everything before your voice starts and press delete. Do the same to everything after your voice stops, and you should be ready to export the take. Again, here is an example:
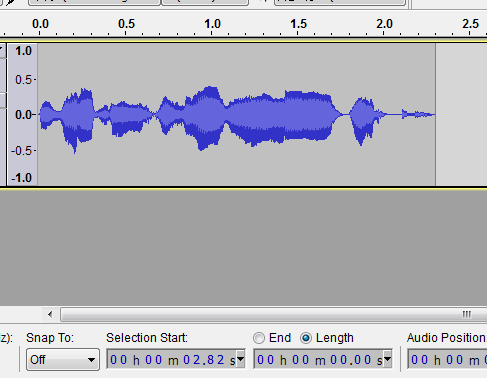
See how it extends to 2.3 seconds up at the top? That's a good sign. With the excess trimmed and the timing accurate, I'll be able to mix this in where it needs to go as soon as you send it to me.
Top
Compared to the previous section, this should be a piece of cake.
You really need to make sure that you are close enough to your microphone and speaking loudly enough to register a good wave. A lot of people wind up accidentally making very quiet recordings, and then having to amplify their voice so much in post that a lot of background noise and electric hum gets amplified right along with it.
If you do a test-recording and your wave looks like this from the get-go...
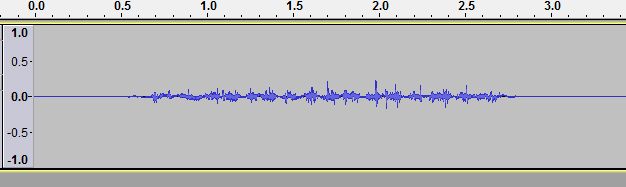
...then that's too quiet, and you'll need to do something about it.
Audacity has a recording volume adjustment level that it syncs with your OS's. If you adjust one, it should adjust the other automatically. Try fiddling with this as you experiment with different distances from the mic and speaking volumes until you find a good balance.
Finally, and this should be a bit more obvious, but watch out for clipping. You don't want your recorded waveform to be hitting the ceiling or the floor:
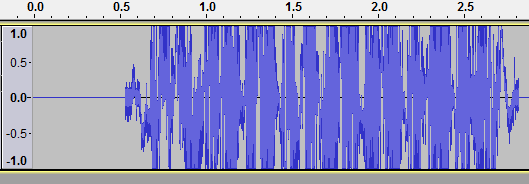
This is a pretty extreme example, too. Ideally, there will never be any part of your waveform that touches one of the boundaries.
Here is an example of a take with fairly good volume:
Easy, right?
Top
This will be easy, too.
Basically, you want to minimize sound bouncing off of walls and into the microphone. If you live in the middle of nowhere and the wind never blows, you can just go outside, but this won't work for most of us. The big thing to avoid, therefore, is large empty rooms with hard floors.
You could nail everything else but still get yucky-sounding results if you record in a place like this.
Shelves full of books or whatever else do a great job of absorbing sound. Other things like beds, chairs, curtains and carpeting help a lot, too.
If I were recording at that desk, I might pile up the pillows from the bed on the windowsill and/or face the bookshelf.
What really works well - so well that some professionals use them - are walk-in closets with clothing on hangars. A place like this can be hard to record in, but clothes eat reverb better than almost anything.
If you're curious about what kind of difference location can make, have a listen to this.
I don't expect everyone to have a great place to record, but I do hope you're willing to experiment a little to find the best place you can. When two characters are talking face-to-face and one has way more reverb than the other, it's really distracting.
Top
This is optional.
For some people, it might not be necessary at all. I can actually do it on my end if you're unsure, too, although you'll have to do something to help me with that. I'll explain below.
When you press record and just sit in silence, do you really record silence? Probably not. Instead, if you look and/or listen closely, you'll discover that there is a constant hum or hiss of quiet electrical noise. It's nice to get this out, and Audacity has an effect-algorithm to do just that. You just have to give it a pure sample of the noise you want to filter.
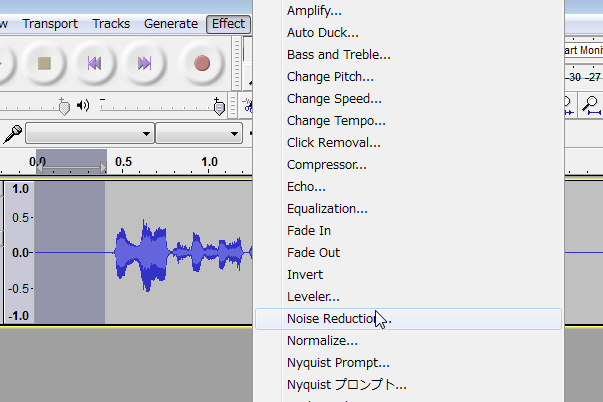
Let's say that between the moment you pressed record and the moment you started speaking, there was a half-second of this pseudo-silence. After you've stopped recording, simply use the cursor to highlight this area. Now, click Effect -> Noise Reduction.
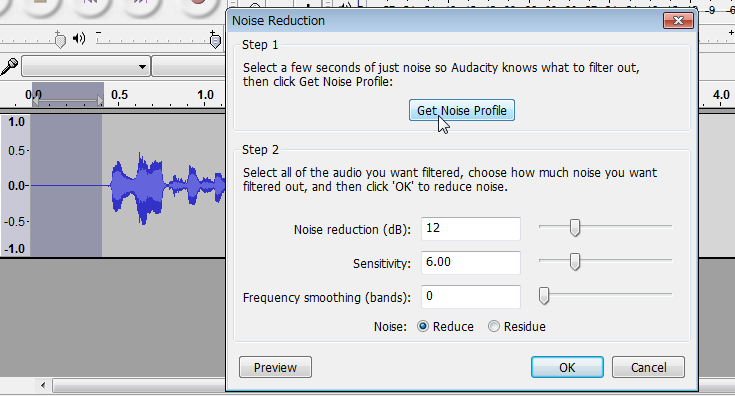
When the prompt appears, you're going to want to click on the button that says Get Noise Profile. The prompt will then disappear, but it will have taken the bit you had highlighted as a sample.
After this, simply highlight all of the audio in the recording and click Effect -> Noise Reduction for a second time. Now, you're just going to click OK.
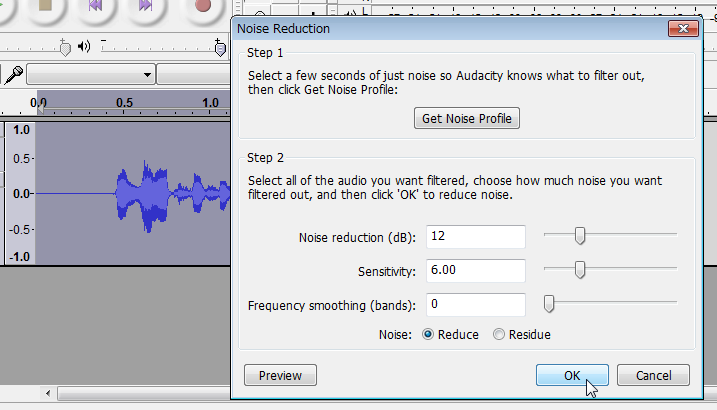
In summary, what happens next is that Audacity will filter anything in your first selection out of everything in your second selection. I hope that makes sense. By the way, leaving those settings in Step 2 at their defaults should be fine.
The only caveat is that you shouldn't rely on this to get rid of really big noise. If you try, Audacity won't always be able to distinguish your voice from the noise itself, and you'll get distortion. This can also happen if your voice was too quiet in the recording. Of course, you also need to be careful not to filter out anything other than the pseudo-silence, too, including little clicks or breaths, because that can cause distortion as well.
If you're curious, take a listen to this recording that demonstrates various degrees of noise and filtering.
Like I said, I can take care of this step for you if you prefer, assuming the level of noise is even an issue. However, this does mean that you'll need to give me a good second or two of noisy-silence, preferably from the same session that you recorded your lines.
Top
You'll find that all lines with lip-syncing are marked in the script.
In short, don't worry about them...much.
There are only two things I don't want to have:
-Speaking when there is no lip movement.
-Lip movement when there is no speaking.
In the original Japanese games, nearly all lip movement is not carefully synced up with the voices, especially in the first one. Most of the time, when a character speaks, his or her mouth moves with a fixed-cycle animation that is only two or three frames. The second game is a little more involved, but just barely.
Simply give the visual a look when you come to a lip-synced line, watch out for long pauses, and mind your time limits a little more strictly. If there is ever a big problem, we'll fix it, but I've tested every line in the script and I don't think we'll ever run into anything that bad. Imprecise lip-syncing is part of the original, and we can keep it in the translation.
Also, you should know that we have cracked the animation algorithms in both games, and we can do minor tweaking as necessary, within limits of course.
Top
Throughout the script, you'll notice that some lines have words in parenthesis. As you might guess, this just means that it's up to you to choose whether or not to say them. We simply want you to do whatever is necessary to deliver the lines convincingly and within the time limits.
None of the lines are set in stone, either. Whether because of a timing problem, a delivery problem, or the line simply being dumb in your opinion, you are more than welcome to talk to me about changing a line and/or to give your own idea a shot and send it in.
Top
(Note: if you're submitting an audition, please see the instructions on the cast page.)
It would be a shame to go through all of this trouble to give me good quality, then accidentally export to MP3.
Proper exporting is very simple. In Audacity, click File -> Export. When you see this window pop up, make sure that WAV is selected as the filetype. You'll have to excuse my Japanese OS here.
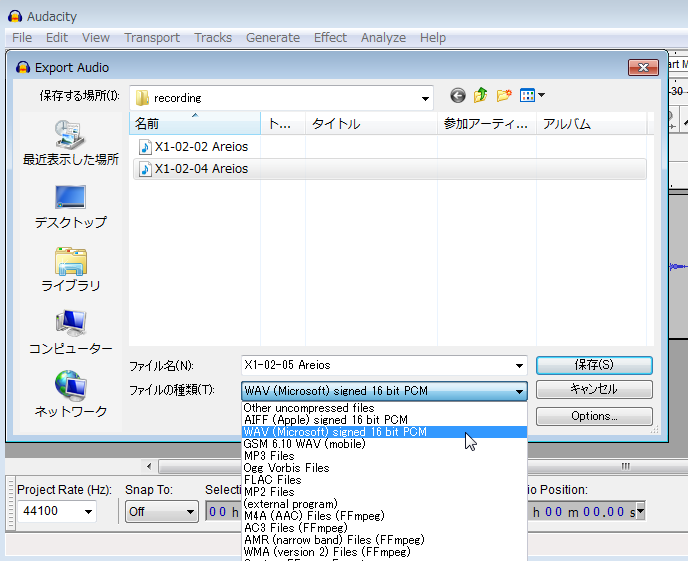
If you know what you're doing, you can also export FLAC if you like. FLAC is a lossless, highly efficient audio compression format. However, some computers won't have FLAC encoding ready to go, so if you hit snags there, WAV format is just fine.
Now it's time talk about file-naming!
In the script, you'll see that everything is broken down into numbered scenes, and that every line is numbered, too. I want you to export every line as an individual file, and name it like this:
<X1/X2><hyphen><scene-number><hyphen><line-number><space><character-name>.<filetype>
Please use two digits for the numbers. Also, if you want to add some sort of note, please put it after the character-name.
For example, if you are playing Areios, and you just recorded Line 02 in Scene 13 of Xanadu 1, you should name the file:
X1-13-02 Areios whateverelseyouwant.wav
The email for this project is xanadudub@gmail.com. Gmail allows attachments up to 25 megabytes in size, so please split and bundle your files appropriately. ZIP and RAR compression are fine. Also, if you want to try giving me everything via Google-drive or some other cloud-storage/file-hosting method, that's fine, too.
Top
1. Record and export in 16-bit, 44,100Hz lossless quality, in this case meaning WAV or FLAC.
2. Measure your takes very carefully down to the tenth of a second and make sure they are as close as possible to the number of seconds written next to the line in the script. Even if you are an audio-recording veteran, please look at the section above dedicated to how I want you to do this.
3. Make sure that your mic, your recording environment, and your voice volume are all as good as you can manage.
4. Don't worry about precise lip-syncing. If possible, just watch out for pauses where the character's lips stop altogether for an extended time. These lines are noted in the script, along with possible adjustments.
5. Words in parenthesis are optional, and you are welcome to experiment with altering the wording of your lines.
6. Start your filename with X1 or X2, hyphen, scene-number, hyphen, line number…using two digits each time…and follow that with a space and the character's name. For example, X1-13-02 Areios whateverelseyouwant.wav.
7. Send me your stuff at xanadudub@gmail.com.
Next to every English line in the script, without exception, you'll find the number of seconds that the corresponding Japanese original took up measured to an accuracy of one-tenth of a second. Please aim for your takes to match these times.
You do not have to be perfectly exact. However, you will probably need to be within a few tenths of a second, and if you're more than 0.5 seconds off, we probably won't be able to use the take.
Also, be aware that it is much more dangerous to exceed a time than not to fill it. In other words, if the script calls for 5.4 seconds, it is much better to come in at 5.2 seconds than 5.6 seconds. The trouble with going over is that you force the next line to be abrupt, and even risk overlapping it. It's much better for there to be a slightly longer pause between lines, generally speaking.
Wherever the English timing can, or even should, be different from the Japanese timing, I have noted this in the script. This should be easy to understand, but don't hesitate to ask me if you're confused.
So, here is how to measure your timing.
At the bottom of the Audacity window, you should see an option to select End or Length. Click Length. Then, click the arrow in the box below that and select hh:mm:ss + hundredths. Now, whenever you use your cursor to highlight a section of audio, this box will show the amount of time you have highlighted down to the hundredth of a second.
This next step is key: Zoom in. You can do this with Ctrl+1, or you can click View -> Zoom In. Do it repeatedly until you see dots representing 1/10 of a second, or at least one step before that.
If you do not do this, then you will not be able to measure the length of a take accurately. For example, as you can see above, I have measured this take to be 2.31 seconds long while zoomed in. However, let's do some excessive zooming out and measure again.
This is the exact same audio, and I've tried to measure it carefully with my mouse, but zoomed out, I'm getting an inaccurate reading of 2.41 seconds. As I said before, a tenth of a second isn't necessarily deal-breaking, but there's really no reason not to be measuring accurately here.
Zooming in is also important for when you cut off unnecessary sound from the beginning and end of your take. When you are zoomed in, you can clearly see where your speaking starts and stops. However, if you are zoomed out too far, you run the risk of accidentally chopping off a little bit of your voice when you delete the surrounding excess.
Once you've got a take that measures out like you want, just highlight everything before your voice starts and press delete. Do the same to everything after your voice stops, and you should be ready to export the take. Again, here is an example:
See how it extends to 2.3 seconds up at the top? That's a good sign. With the excess trimmed and the timing accurate, I'll be able to mix this in where it needs to go as soon as you send it to me.
**Note: Audacity does
have an option for voice-activated recording which
in theory would simplify this whole process, but I
find it to be unreliable, and it also gets in the
way of doing noise filtering later. Use at your own
risk. **
Top
5.
Speaking/recording at a good volume
Compared to the previous section, this should be a piece of cake.
You really need to make sure that you are close enough to your microphone and speaking loudly enough to register a good wave. A lot of people wind up accidentally making very quiet recordings, and then having to amplify their voice so much in post that a lot of background noise and electric hum gets amplified right along with it.
If you do a test-recording and your wave looks like this from the get-go...
...then that's too quiet, and you'll need to do something about it.
Audacity has a recording volume adjustment level that it syncs with your OS's. If you adjust one, it should adjust the other automatically. Try fiddling with this as you experiment with different distances from the mic and speaking volumes until you find a good balance.
Finally, and this should be a bit more obvious, but watch out for clipping. You don't want your recorded waveform to be hitting the ceiling or the floor:
This is a pretty extreme example, too. Ideally, there will never be any part of your waveform that touches one of the boundaries.
Here is an example of a take with fairly good volume:
Easy, right?
Top
6.
Choosing a location with low reverb for recording
This will be easy, too.
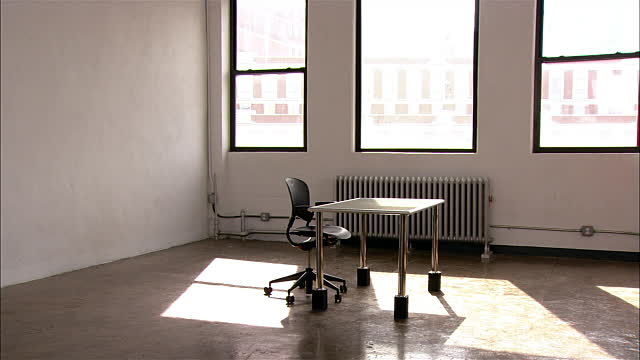
Basically, you want to minimize sound bouncing off of walls and into the microphone. If you live in the middle of nowhere and the wind never blows, you can just go outside, but this won't work for most of us. The big thing to avoid, therefore, is large empty rooms with hard floors.
You could nail everything else but still get yucky-sounding results if you record in a place like this.
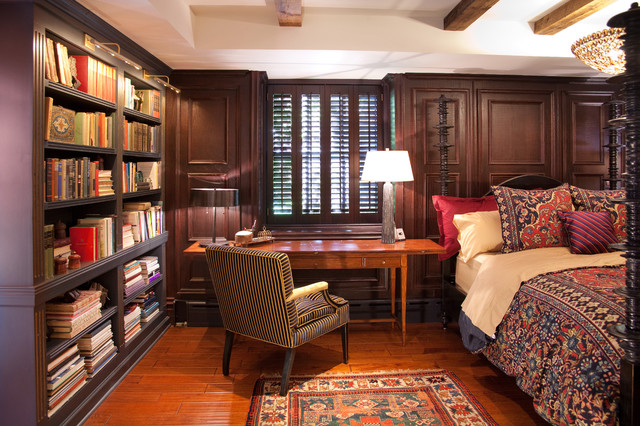
Shelves full of books or whatever else do a great job of absorbing sound. Other things like beds, chairs, curtains and carpeting help a lot, too.
If I were recording at that desk, I might pile up the pillows from the bed on the windowsill and/or face the bookshelf.
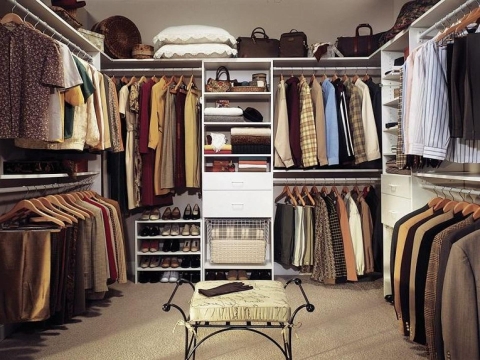
What really works well - so well that some professionals use them - are walk-in closets with clothing on hangars. A place like this can be hard to record in, but clothes eat reverb better than almost anything.
If you're curious about what kind of difference location can make, have a listen to this.
I don't expect everyone to have a great place to record, but I do hope you're willing to experiment a little to find the best place you can. When two characters are talking face-to-face and one has way more reverb than the other, it's really distracting.
Top
7.
Noise filtering
This is optional.
For some people, it might not be necessary at all. I can actually do it on my end if you're unsure, too, although you'll have to do something to help me with that. I'll explain below.
When you press record and just sit in silence, do you really record silence? Probably not. Instead, if you look and/or listen closely, you'll discover that there is a constant hum or hiss of quiet electrical noise. It's nice to get this out, and Audacity has an effect-algorithm to do just that. You just have to give it a pure sample of the noise you want to filter.
Let's say that between the moment you pressed record and the moment you started speaking, there was a half-second of this pseudo-silence. After you've stopped recording, simply use the cursor to highlight this area. Now, click Effect -> Noise Reduction.
When the prompt appears, you're going to want to click on the button that says Get Noise Profile. The prompt will then disappear, but it will have taken the bit you had highlighted as a sample.
After this, simply highlight all of the audio in the recording and click Effect -> Noise Reduction for a second time. Now, you're just going to click OK.
In summary, what happens next is that Audacity will filter anything in your first selection out of everything in your second selection. I hope that makes sense. By the way, leaving those settings in Step 2 at their defaults should be fine.
The only caveat is that you shouldn't rely on this to get rid of really big noise. If you try, Audacity won't always be able to distinguish your voice from the noise itself, and you'll get distortion. This can also happen if your voice was too quiet in the recording. Of course, you also need to be careful not to filter out anything other than the pseudo-silence, too, including little clicks or breaths, because that can cause distortion as well.
If you're curious, take a listen to this recording that demonstrates various degrees of noise and filtering.
Like I said, I can take care of this step for you if you prefer, assuming the level of noise is even an issue. However, this does mean that you'll need to give me a good second or two of noisy-silence, preferably from the same session that you recorded your lines.
Top
8.
On lip-syncing
You'll find that all lines with lip-syncing are marked in the script.
In short, don't worry about them...much.
There are only two things I don't want to have:
-Speaking when there is no lip movement.
-Lip movement when there is no speaking.
In the original Japanese games, nearly all lip movement is not carefully synced up with the voices, especially in the first one. Most of the time, when a character speaks, his or her mouth moves with a fixed-cycle animation that is only two or three frames. The second game is a little more involved, but just barely.
Simply give the visual a look when you come to a lip-synced line, watch out for long pauses, and mind your time limits a little more strictly. If there is ever a big problem, we'll fix it, but I've tested every line in the script and I don't think we'll ever run into anything that bad. Imprecise lip-syncing is part of the original, and we can keep it in the translation.
Also, you should know that we have cracked the animation algorithms in both games, and we can do minor tweaking as necessary, within limits of course.
Top
9.
Optional words and adapting lines
Throughout the script, you'll notice that some lines have words in parenthesis. As you might guess, this just means that it's up to you to choose whether or not to say them. We simply want you to do whatever is necessary to deliver the lines convincingly and within the time limits.
None of the lines are set in stone, either. Whether because of a timing problem, a delivery problem, or the line simply being dumb in your opinion, you are more than welcome to talk to me about changing a line and/or to give your own idea a shot and send it in.
Top
10. Exporting WAV files with proper naming and
sending them to me
(Note: if you're submitting an audition, please see the instructions on the cast page.)
It would be a shame to go through all of this trouble to give me good quality, then accidentally export to MP3.
Proper exporting is very simple. In Audacity, click File -> Export. When you see this window pop up, make sure that WAV is selected as the filetype. You'll have to excuse my Japanese OS here.
If you know what you're doing, you can also export FLAC if you like. FLAC is a lossless, highly efficient audio compression format. However, some computers won't have FLAC encoding ready to go, so if you hit snags there, WAV format is just fine.
Now it's time talk about file-naming!
In the script, you'll see that everything is broken down into numbered scenes, and that every line is numbered, too. I want you to export every line as an individual file, and name it like this:
<X1/X2><hyphen><scene-number><hyphen><line-number><space><character-name>.<filetype>
Please use two digits for the numbers. Also, if you want to add some sort of note, please put it after the character-name.
For example, if you are playing Areios, and you just recorded Line 02 in Scene 13 of Xanadu 1, you should name the file:
X1-13-02 Areios whateverelseyouwant.wav
The email for this project is xanadudub@gmail.com. Gmail allows attachments up to 25 megabytes in size, so please split and bundle your files appropriately. ZIP and RAR compression are fine. Also, if you want to try giving me everything via Google-drive or some other cloud-storage/file-hosting method, that's fine, too.
Top
11. The digest version
1. Record and export in 16-bit, 44,100Hz lossless quality, in this case meaning WAV or FLAC.
2. Measure your takes very carefully down to the tenth of a second and make sure they are as close as possible to the number of seconds written next to the line in the script. Even if you are an audio-recording veteran, please look at the section above dedicated to how I want you to do this.
3. Make sure that your mic, your recording environment, and your voice volume are all as good as you can manage.
4. Don't worry about precise lip-syncing. If possible, just watch out for pauses where the character's lips stop altogether for an extended time. These lines are noted in the script, along with possible adjustments.
5. Words in parenthesis are optional, and you are welcome to experiment with altering the wording of your lines.
6. Start your filename with X1 or X2, hyphen, scene-number, hyphen, line number…using two digits each time…and follow that with a space and the character's name. For example, X1-13-02 Areios whateverelseyouwant.wav.
7. Send me your stuff at xanadudub@gmail.com.